
In the world of woodworking, the key to crafting impeccable wooden projects lies in mastering the art of joinery. Whether you’re a seasoned woodworker or just starting out, understanding the right tools to use for seamless wood connections is essential. From the trusty chisel to the versatile dovetail saw, these tools not only ensure a secure bond but also add a touch of craftsmanship to your creations. In this article, we will explore some of the must-have tools for mastering joinery and discover how they can elevate your woodworking skills to new heights.
Types of Joinery
Butt Joint
The butt joint is one of the simplest and most common types of joinery used in woodworking. It involves joining two pieces of wood by simply butting them together and fastening them with screws, nails, or adhesives. While the butt joint is easy to create, it is not the strongest type of joint and is often reinforced with other methods such as dowels or biscuits for added strength.
Miter Joint
The miter joint is commonly used for joining pieces of wood at a 45-degree angle, creating a clean and seamless corner. This type of joint is often found in picture frames, door frames, and decorative moldings. It requires precise measuring and cutting to ensure a tight and accurate fit. The miter joint can be reinforced with splines or biscuits for added strength.
Dado Joint
The dado joint is a versatile and strong joint used for joining shelves or dividers to a piece of furniture or cabinet. It involves cutting a rectangular groove, or dado, into one piece of wood and fitting another piece of wood into the groove. This type of joint provides a large gluing surface and can be further reinforced with screws or nails for added stability.
Dovetail Joint
The dovetail joint is renowned for its strength and durability. It is commonly used in drawer construction and box making. The joint consists of interlocking pins and tails that form a strong and visually appealing connection. Creating dovetail joints requires skill and precision, often done by hand with chisels or using a dovetail jig for more consistency.
Mortise and Tenon Joint
The mortise and tenon joint is a classic and reliable joint used in woodworking for centuries. It involves cutting a square or rectangular hole, called the mortise, into one piece of wood, and creating a corresponding projection, called the tenon, on another piece of wood. The mortise and tenon joint provides a strong and stable connection, often used in furniture, frames, and doors.
Biscuit Joint
The biscuit joint is a fast and easy way to join two pieces of wood together. It involves cutting matching slots in both pieces of wood and inserting an oval-shaped piece of compressed wood, called a biscuit, into the slots. When glued and clamped, the biscuits expand, creating a secure joint. Biscuit joints are commonly used in panel construction and edge joining.
Box Joint
The box joint, also known as a finger joint, is a type of joint used for connecting the edges of boards together to form a box or drawer. It involves cutting interlocking rectangular slots on alternating boards, creating a strong and visually striking joint. Box joints can be made using hand tools or with the assistance of a router and a box joint jig.
Half-Lap Joint
The half-lap joint is a simple and strong joint used for connecting two pieces of wood at a right angle. It involves removing half of the thickness of each piece of wood at the joint, creating a flush and seamless connection. The half-lap joint is commonly used in table legs, frames, and other structural applications.
Tongue and Groove Joint
The tongue and groove joint is commonly used for joining boards together, such as in flooring, paneling, and cabinet construction. It involves cutting a groove, or channel, in one piece of wood and a corresponding tongue, or projection, on the other piece. This type of joint provides strength, stability, and allows for expansion and contraction of the wood.
Pocket Hole Joint
The pocket hole joint is a quick and easy method for joining two pieces of wood at an angle. It involves drilling an angled hole, known as a pocket, into one piece of wood, and then using a special self-tapping screw to connect it to another piece of wood. The pocket hole joint is commonly used in furniture construction, cabinet making, and other woodworking projects.
Essential Joinery Tools
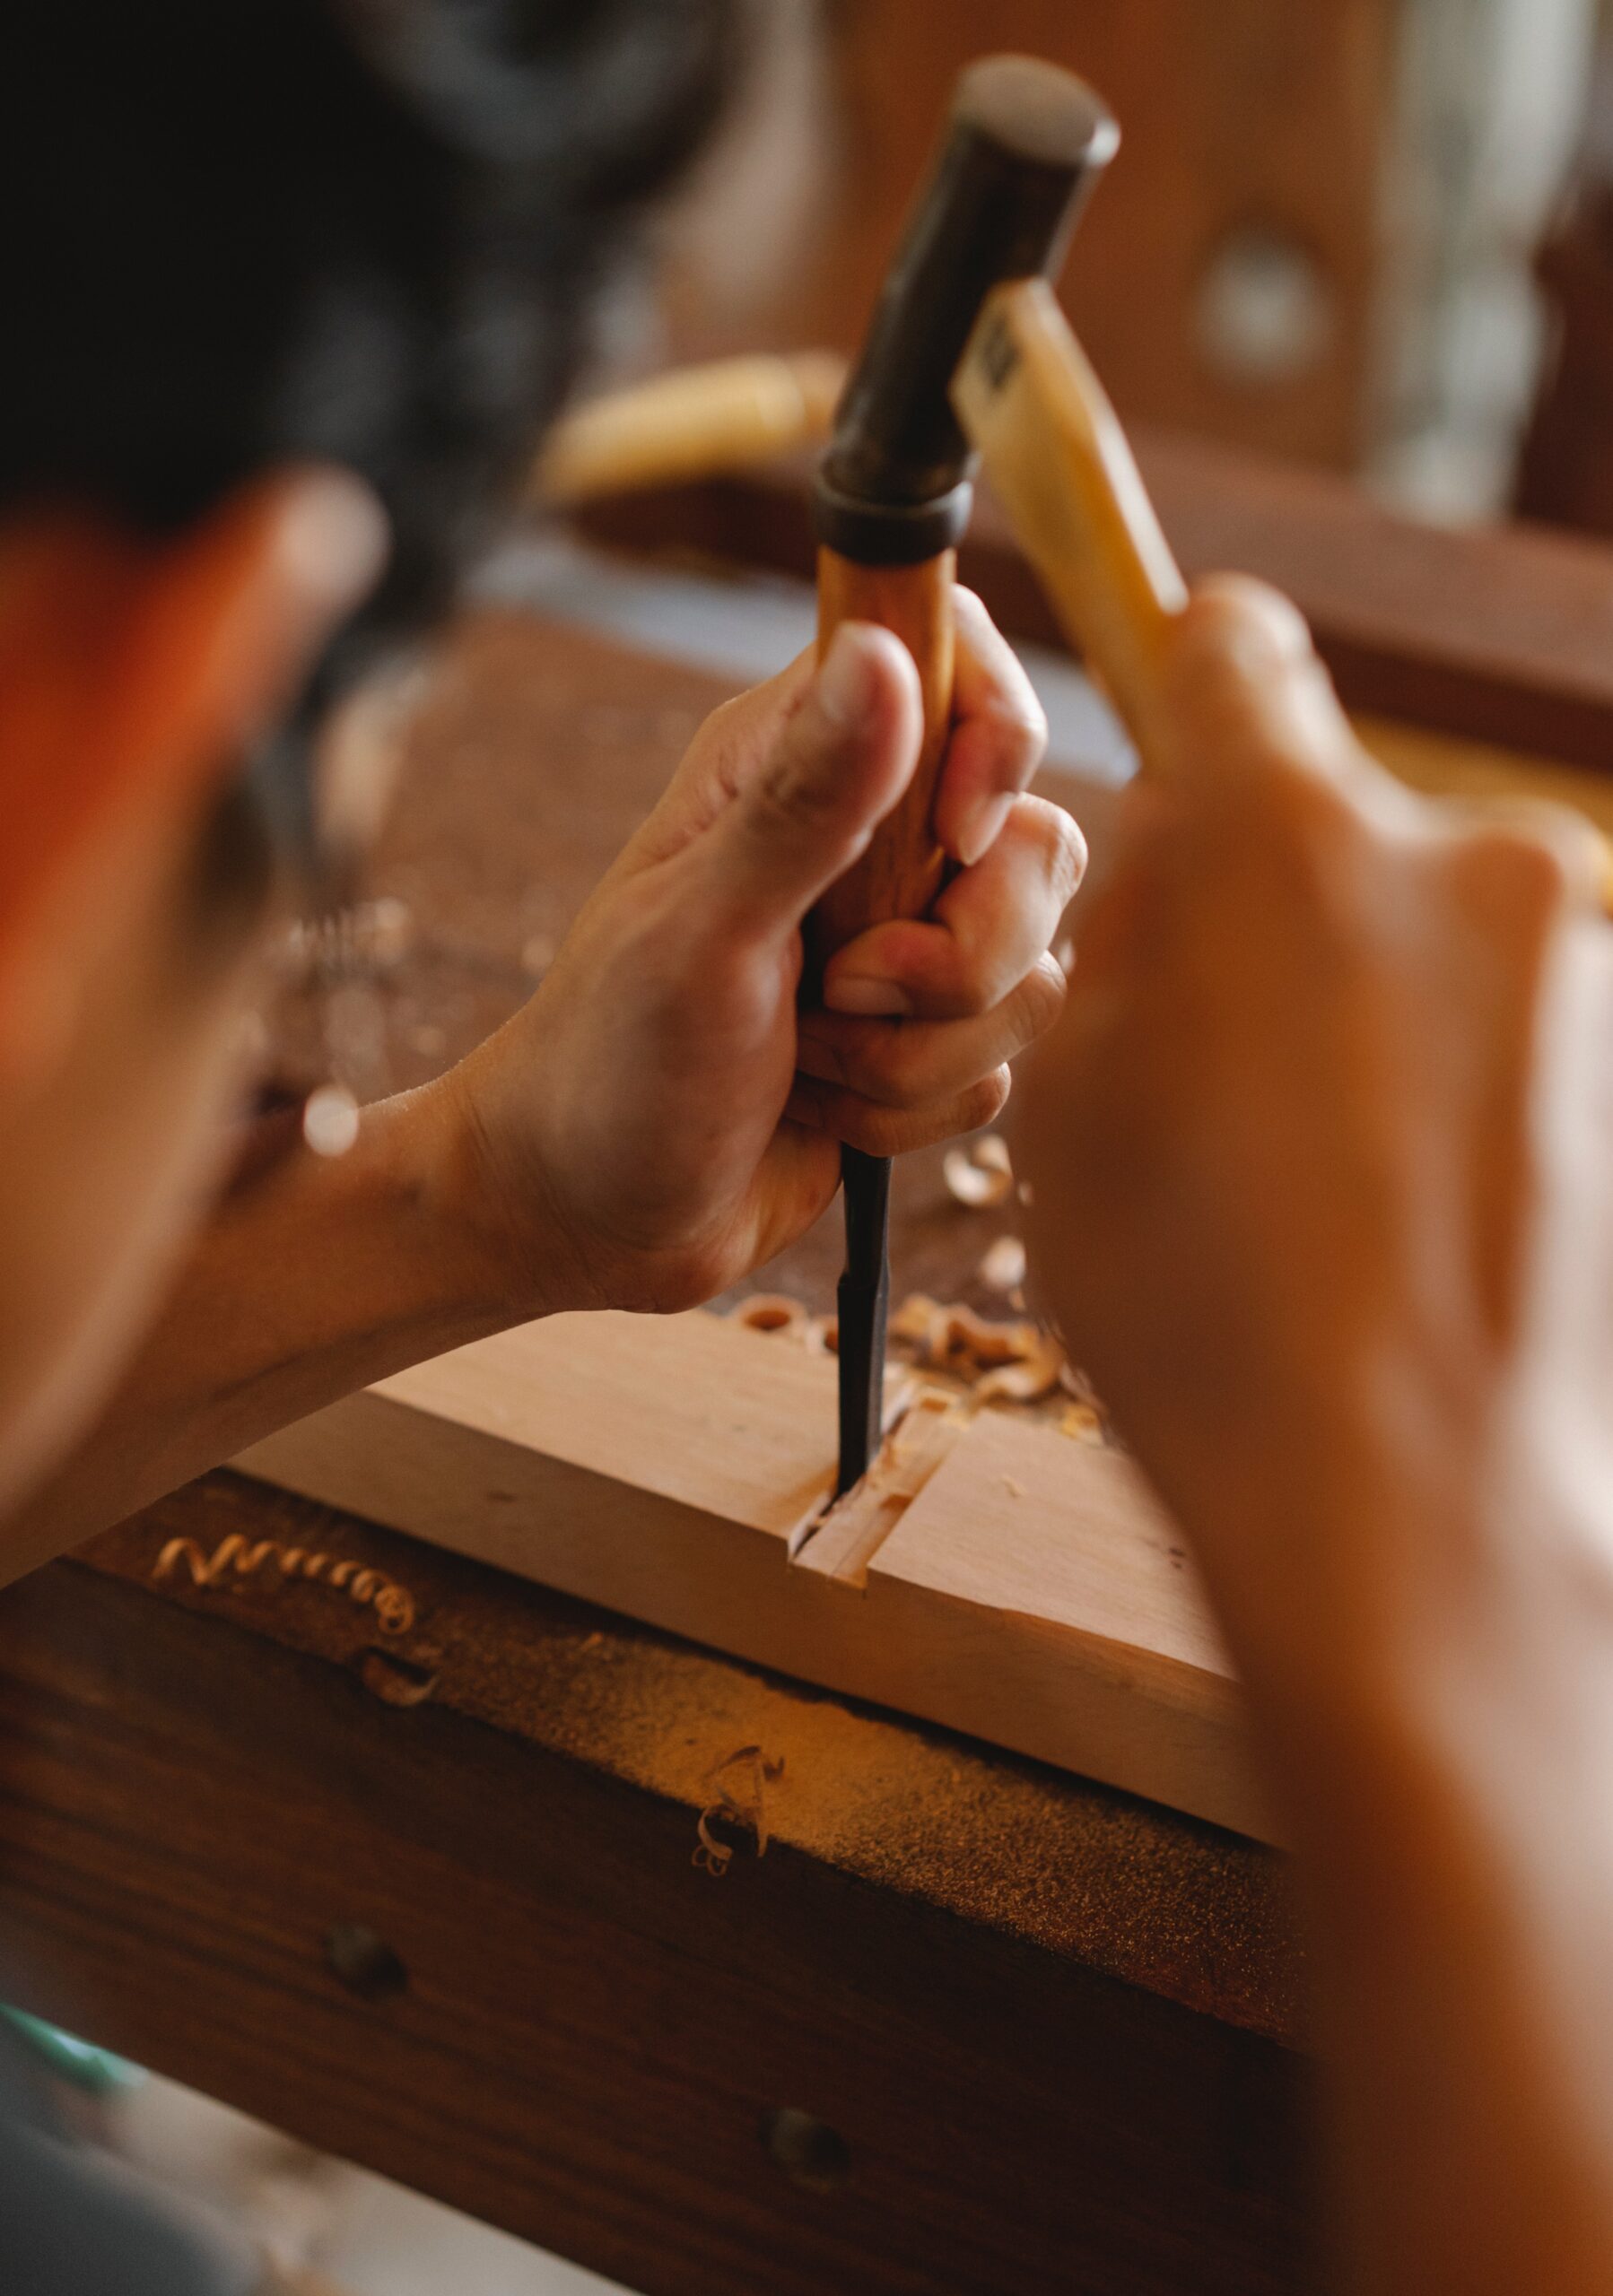
Chisels
Chisels are essential tools for woodworking joinery. They come in various sizes and shapes, such as bench chisels, mortise chisels, and dovetail chisels. They are used for cutting and shaping wood, particularly when creating mortises, cleaning up joints, and removing excess material.
Mallet
A mallet is a hammer-like tool used in woodworking to strike chisels or other tools without damaging them. It provides controlled and precise force to drive chisels into wood or to make adjustments during joinery work.
Saw
Saws play a crucial role in joinery work. Hand saws, such as dovetail saws or tenon saws, are used for cutting precise and accurate joints. Power saws, such as circular saws or table saws, are used for larger scale joinery work, such as cutting boards or panels to size.
Router
A router is a versatile tool used in woodworking for various joinery tasks. It can be used to create dados, rabbets, and other intricate joinery details. Routers can be handheld or mounted to a router table for added stability and precision.
Woodworking Clamps
Clamps are essential for holding pieces of wood together during joinery work. They come in various sizes and types, such as bar clamps, pipe clamps, and quick-release clamps. Clamps ensure tight and secure joints, allowing glue to dry properly and prevent movement during assembly.
Squares
Squares, such as combination squares or try squares, are used for measuring and marking accurate right angles during joinery work. They are essential for ensuring precise and square cuts, ensuring tight and seamless joints.
Coping Saw
A coping saw is a small, fine-toothed saw used for intricate and curved cutting in joinery work. It is particularly useful when creating dovetail joints or other intricate joinery details.
Biscuit Joiner
A biscuit joiner, also known as a plate joiner, is a power tool used specifically for creating biscuit joints. It cuts consistent slots in wood, allowing for quick and precise alignment and joining of pieces.
Dovetail Jig
A dovetail jig is a specialized tool used for creating dovetail joints. It guides the cutting of pins and tails, ensuring consistent and accurate dovetail joints without the need for extensive handwork.
Pocket Hole Jig
A pocket hole jig is a tool used for creating pocket hole joints. It guides the drilling of angled holes and the insertion of screws, creating quick and simple joinery connections.

Choosing the Right Wood
Consider the Project
When choosing wood for joinery, it’s essential to consider the project at hand. Different projects have different requirements for strength, appearance, and durability. For example, a piece of furniture may require a hardwood with a beautiful grain pattern, while a structural application may prioritize strength and stability.
Wood Species
Different wood species have different characteristics, including density, hardness, and grain pattern. Common wood species used in joinery include oak, maple, cherry, and walnut. Each species has its own unique look and properties, so it’s important to choose one that fits the desired aesthetic and meets the project’s requirements.
Grain Pattern
The grain pattern of wood can significantly impact the appearance and strength of joinery. Straight grain patterns are generally strong and stable, while more intricate patterns, such as curly or birds eye grain, can add visual interest to the project. Consider the desired aesthetic and the structural requirements when selecting wood with the appropriate grain pattern.
Wood Quality
The quality of the wood is crucial for successful joinery. Look for wood that is free from knots, cracks, or other defects that can weaken the joinery. The moisture content of the wood is also important, as excessive moisture can lead to warping or shrinking of the wood, affecting the integrity of the joinery.
Preparing the Wood
Squaring and Jointing
Before starting joinery work, it’s essential to ensure that the edges and faces of the wood are square and flat. Squaring involves using a square or a combination square to check for 90-degree angles. Jointing is the process of creating smooth, flat surfaces on the wood using hand planes or jointers.
Planing and Thicknessing
Depending on the project, the wood may need to be planed to achieve the desired thickness and smoothness. A thickness planer or hand plane can be used to remove material and create uniform thickness throughout the wood.
Cutting Stock Pieces
Once the wood is squared and planed, it can be cut into the necessary stock pieces for the joinery. Accurate measuring and marking are crucial for achieving precise and tight-fitting joints.
Marking Joins
Using marking gauges, pencils, or other marking tools, mark the areas where the joinery will be created. This helps ensure accurate and consistent cuts during the joinery process.

Measuring and Marking
Using Precision Measuring Tools
Measuring accurately is vital for successful joinery. Precision measuring tools, such as calipers, tape measures, or rulers, should be used to ensure accurate dimensions for both stock preparation and joinery layout.
Transferring Measurements
Transferring measurements from one piece of wood to another is essential for creating seamless and accurate joinery. This can be done using marking gauges, dividers, or rulers to ensure consistent dimensions and angles.
Marking Tools
Marking tools, such as marking knives or awls, are used to create precise and visible lines on the wood. These lines serve as guides for accurate cutting and fitting of joints during the joinery process.
Joinery Layout
Proper layout techniques are crucial for creating well-fitting joints. Layout involves marking where cuts will be made, where holes will be drilled, and how the pieces will fit together. Accurate and careful layout ensures successful joinery assembly.
Layout Techniques
Using a Combination Square
A combination square is a versatile tool used for measuring and marking 90-degree angles, as well as transferring measurements. It can be used to ensure accurate and square cuts during joinery layout.
Using a Marking Gauge
A marking gauge is particularly useful for marking consistent lines parallel to the edge of the wood. It is commonly used for marking the depth of cuts or the positions of joints.
Using a Dovetail Jig
A dovetail jig is an excellent tool for creating consistent and accurate dovetail joints. It guides the user in cutting both pins and tails, ensuring tight and visually appealing joints.
Using Templates or Patterns
For repetitive joinery tasks or intricate designs, templates or patterns can be used. These guides help ensure consistency and accuracy when marking and cutting joinery.
Digital Layout Tools
In modern woodworking, digital layout tools, such as digital angle finders or laser levels, can be used for precise and efficient layout. These tools can provide accurate measurements and angles, enhancing the overall precision of the joinery work.

Cutting Joinery
Hand Tools vs. Power Tools
Joinery can be accomplished using both hand tools and power tools, depending on personal preference and the complexity of the project. Hand tools, such as chisels and hand saws, offer a traditional approach and allow for more control. Power tools, such as routers or table saws, can speed up the process and provide consistent results.
Using Chisels
Chisels are crucial for creating precise and clean cuts in joinery work. They can be used to remove material, make notches, or refine the shape of the joint. Sharp chisels and careful technique are key to achieving quality joinery cuts.
Using Hand Saws
Hand saws are essential tools for cutting joinery, especially when precision cuts are required. Dovetail saws, tenon saws, or coping saws can be used to create accurate and clean cuts in various joinery techniques.
Using a Router
Routers are versatile power tools that can be used for many joinery tasks. With the appropriate router bit or jig, they can cut dadoes, rabbets, and other intricate shapes, allowing for precise and consistent joinery.
Using a Table Saw
Table saws are commonly used for cutting stock pieces to length or width for joinery. They can also be equipped with dado blades for creating insets or grooves in the wood.
Using a Bandsaw
Bandsaws are useful for making curved or irregular cuts in joinery work. They allow for greater flexibility and control, especially when cutting complex joinery details or shaping the wood.
Using a Dovetail Jig
A dovetail jig simplifies the process of creating dovetail joints, particularly when consistent and precise cuts are required. It guides the user in cutting both pins and tails, ensuring a tight and visually pleasing dovetail joint.
Using a Biscuit Joiner
A biscuit joiner simplifies the process of creating biscuit joints. It accurately cuts slots in the wood, allowing for quick and efficient alignment and joining of pieces.
Using a Pocket Hole Jig
A pocket hole jig is a valuable tool for creating pocket hole joints. It guides the drilling of angled holes and the insertion of screws, making it easy to create strong and hidden joints.
Joinery Assembly
Dry Fitting
Dry fitting involves assembling the joinery without glue or fasteners to ensure that all the pieces fit together properly. This step allows for adjustments or modifications before final assembly, ensuring seamless and accurate joinery.
Applying Glue
When the joinery pieces fit together correctly, glue can be applied to create a strong and permanent bond. Wood glue is typically used for joining wood pieces together, and it is important to use the proper amount and spread it evenly to ensure a secure joint.
Clamping Techniques
Clamps are essential for holding joinery pieces together during glue-up. They provide the necessary pressure to ensure a tight and even bond. Different clamping techniques, such as bar clamps or pipe clamps, may be used depending on the size and complexity of the joinery.
Using Fasteners
In addition to glue, fasteners such as screws, nails, or dowels can be used to reinforce joinery and provide extra strength. They can be particularly useful in load-bearing applications or when additional support is needed.
Allowing for Wood Movement
Wood is a natural material that expands and contracts with changes in humidity and temperature. When creating joinery, it is essential to account for this movement to prevent cracking or warping. Techniques such as using elongated screw holes or leaving small gaps can accommodate wood movement without compromising the integrity of the joinery.

Fine-tuning Joints
Trimming Excess
After the joinery assembly, excess material may need to be trimmed or removed for a clean and flush joint. Chisels, hand planes, or sandpaper can be used to carefully remove any uneven or protruding parts, ensuring a seamless and professional finish.
Sanding and Smoothing
Sanding is an important step in fine-tuning joinery. It helps to smooth rough surfaces, remove any remaining tool marks, and prepare the wood for finishing. Gradually increasing the grit of sandpaper, from coarse to fine, will produce a polished and smooth result.
Filling Gaps
Sometimes, joinery may not fit perfectly, resulting in small gaps or imperfections. These gaps can be filled using wood putty or epoxy resin, ensuring a solid and visually appealing joint. The filled areas can then be sanded and finished to blend seamlessly with the rest of the wood.
Repairing Mistakes
Mistakes happen, even to experienced woodworkers. If a joint is not fitting properly or has been damaged, it may be possible to repair it instead of starting from scratch. Tools such as chisels, saws, or adhesives can be used to fix minor issues and salvage the joinery.
Joinery Reinforcement
In some cases, additional reinforcement may be needed to strengthen joinery. Techniques such as adding dowels, splines, or metal brackets can provide extra stability and durability, especially for load-bearing applications or when dealing with heavy objects.
Joinery Maintenance
Regular Cleaning
Woodworking tools used for joinery should be kept clean and free from dust, debris, or dried glue. Regular cleaning of tools, such as chisels, saws, and router bits, helps maintain their performance and prolongs their lifespan.
Lubrication
Some joinery tools, such as hand planes or router bits, may benefit from occasional lubrication. Applying a thin layer of lubricant, such as oil or wax, can reduce friction and make the tools operate more smoothly.
Storage
Proper storage of joinery tools is essential to prevent damage and maintain their functionality. Tools should be stored in a clean and dry environment, away from moisture, extreme temperatures, or direct sunlight. They can be stored in tool cabinets, toolboxes, or dedicated shelves, ensuring easy access and protection.
Repairing Loose Joints
Over time, joinery may loosen due to wood movement or wear and tear. Loose joints can be repaired by disassembling the joint, cleaning off old glue, and applying fresh glue. Clamps or other clamping techniques can be used to secure the joint during the curing process.
Mastering Joinery: Tools That Guarantee Seamless Wood Connections
Joinery is an essential skill in woodworking, allowing for strong and visually appealing connections between pieces of wood. By understanding different types of joinery, acquiring the necessary tools, and following proper techniques, you can achieve seamless and professional-looking joints in your woodworking projects.
The article covers various types of joinery, including the popular butt joint, miter joint, dado joint, dovetail joint, mortise and tenon joint, biscuit joint, box joint, half-lap joint, tongue and groove joint, and pocket hole joint. Each type of joint is explained in detail, highlighting its purpose and application.
In addition to knowing the different types of joinery, having the right tools is crucial. The article explores essential joinery tools such as chisels, mallets, saws, routers, woodworking clamps, squares, coping saws, biscuit joiners, dovetail jigs, and pocket hole jigs. Each tool is described, emphasizing its role in the joinery process.
Choosing the right wood is another important aspect of joinery. The article advises considering the project, wood species, grain pattern, and wood quality when selecting wood for joinery work. It emphasizes the need for strong and visually appealing wood that matches the project’s requirements.
Preparing the wood is essential for successful joinery. The wood needs to be squared and jointed, planed and thicknessed, and cut into stock pieces. Proper measuring and marking techniques are crucial for precise joinery layout.
Measuring and marking accurately is key to achieving seamless joinery. Precision measuring tools, transferring measurements, marking tools, and joinery layout techniques are explained to help ensure accurate and consistent joinery work.
Cutting joinery can be done using hand tools or power tools, depending on personal preference and project complexity. Techniques using chisels, hand saws, routers, table saws, bandsaws, dovetail jigs, biscuit joiners, and pocket hole jigs are described to guide users through the joinery cutting process.
Joinery assembly involves dry fitting, applying glue, clamping techniques, using fasteners, and allowing for wood movement. These steps are essential for achieving durable and stable joinery connections.
Fine-tuning joints ensures a seamless finish. Trimming excess, sanding and smoothing, filling gaps, repairing mistakes, and reinforcing joinery are detailed for achieving high-quality joinery.
Joinery maintenance is necessary to keep tools in optimal condition. Regular cleaning, lubrication, proper storage, and repairing loose joints are important for prolonging the lifespan and functionality of joinery tools and connections.
By mastering joinery techniques and using the right tools, woodworking enthusiasts can create beautiful and enduring wood connections. Whether it’s building furniture, constructing cabinets, or crafting decorative pieces, understanding joinery is crucial for achieving professional results.